WireGuard on OpenBSD with wg(4)
2020-10-25T13:49:12.850Z.
Changelog:
- 2023-04-15T06:57:34.948Z: Added IPv6 configurations.
- 2023-04-16T08:04:05.039Z: Added client configurations (OpenBSD).
This article describes the WireGuard server configuration on OpenBSD 7.3, WireGuard client configuration on iOS 16 and OpenBSD 7.3. Once the configuration is complete, all traffic from the clients will go through the server before reaching the Internet. This is also known as "road warrior" setup.
The network setup:

-
The server has a network interface
vio0connected to the Internet via IPv4 and IPv6. -
The server has a network interface
wg0connected to the WireGuard tunnel. - The server listens on port 50000 for WireGuard traffic.
-
IPv4 address
10.0.7.1/24and IPv6 addressfd00:0:0:7::1/64are assigned to the network interfacewg0on the server. -
IPv4 address
10.0.7.2/32and IPv6 addressfd00:0:0:7:2716::1/80are assigned to the client running iOS. -
IPv4 address
10.0.7.3/32and IPv6 addressfd00:0:0:7:2719::1/80are assigned to the client running OpenBSD.
Enable IP forwarding
Enable IP forwarding on the server:
sysctl net.inet.ip.forwarding=1
sysctl net.inet6.ip6.forwarding=1
To make the settings permanent, save the configuration in
/etc/sysctl.conf:
net.inet.ip.forwarding=1
net.inet6.ip6.forwarding=1
Prepare keys
The server private key and pre-shared key will be placed in the
/etc/wireguard directory:
mkdir -p /etc/wireguard/
Generate the server private key, as root:
openssl rand -base64 32 > /etc/wireguard/server.key
chmod 600 /etc/wireguard/server.key
Generate the pre-shared key:
openssl rand -base64 32 > /etc/wireguard/client-ios.psk
chmod 600 /etc/wireguard/client-ios.psk
openssl rand -base64 32 > /etc/wireguard/client-openbsd.psk
chmod 600 /etc/wireguard/client-openbsd.psk
Each pre-shared key is shared between the server and client.
Configure network interface
Configure the wg0 interface on the server by adding a file
/etc/hostname.wg0:
inet 10.0.7.1 255.255.255.0
inet6 fd00:0:0:7::1 64

wgkey SERVER_PRIVATE_KEY
wgport 50000

# Client (iOS).
wgpeer PEER_PUBLIC_KEY wgpsk PRE_SHARED_KEY wgaip 10.0.7.2/32 wgaip fd00:0:0:7:2716::1/80

# Client (OpenBSD).
wgpeer PEER_PUBLIC_KEY wgpsk PRE_SHARED_KEY wgaip 10.0.7.3/32 wgaip fd00:0:0:7:2719::1/80

up
Note:
-
Replace
SERVER_PRIVATE_KEYwith the content of/etc/wireguard/server.key. -
Replace
PRE_SHARED_KEYwith the content of/etc/wireguard/client-ios.psk. -
The public key (
PEER_PUBLIC_KEY) of the client will be set at a later step.
Start the interface:
sh /etc/netstart wg0
Check the public key of the server:
ifconfig wg0 | grep wgpubkey
The string after wgpubkey shown on screen is the server
public key.
Configure Packet Filter
On the server, add the following rules in /etc/pf.conf:
pass in on egress proto udp from any to egress port 50000
pass out on egress from wg0:network to any nat-to (egress)
Validate and reload the rules:
pfctl -n -f /etc/pf.conf
pfctl -f /etc/pf.conf
Configure WireGuard on client (iOS)
Install WireGuard for iOS, then create a new WireGuard tunnel.
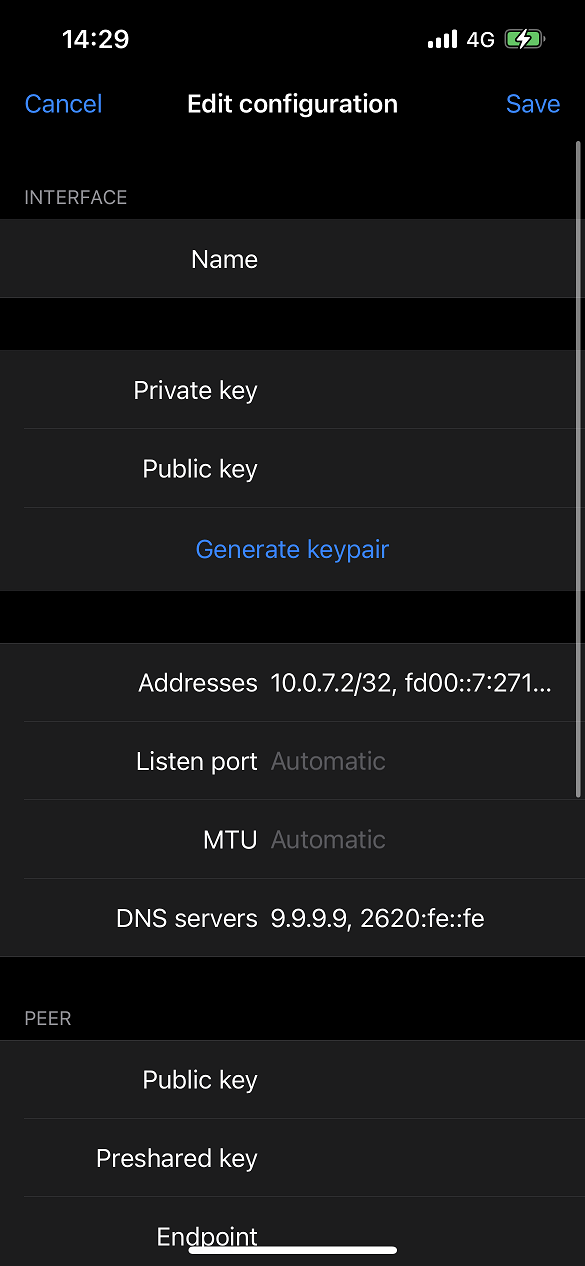
In the interface section:
- Set the Name field with a preferred tunnel name.
- Click Generate keypair to generate the client private key and public key. The public key will be used to update the server configuration.
-
Set the Addresses field with the assigned addresses, separated with a
comma, i.e.
10.0.7.2/32, fd00:0:0:7:2716::1/80. -
Set the DNS servers field with the preferred DNS server. For example,
to use Quad9 DNS, enter
9.9.9.9, 2620:fe::fe.
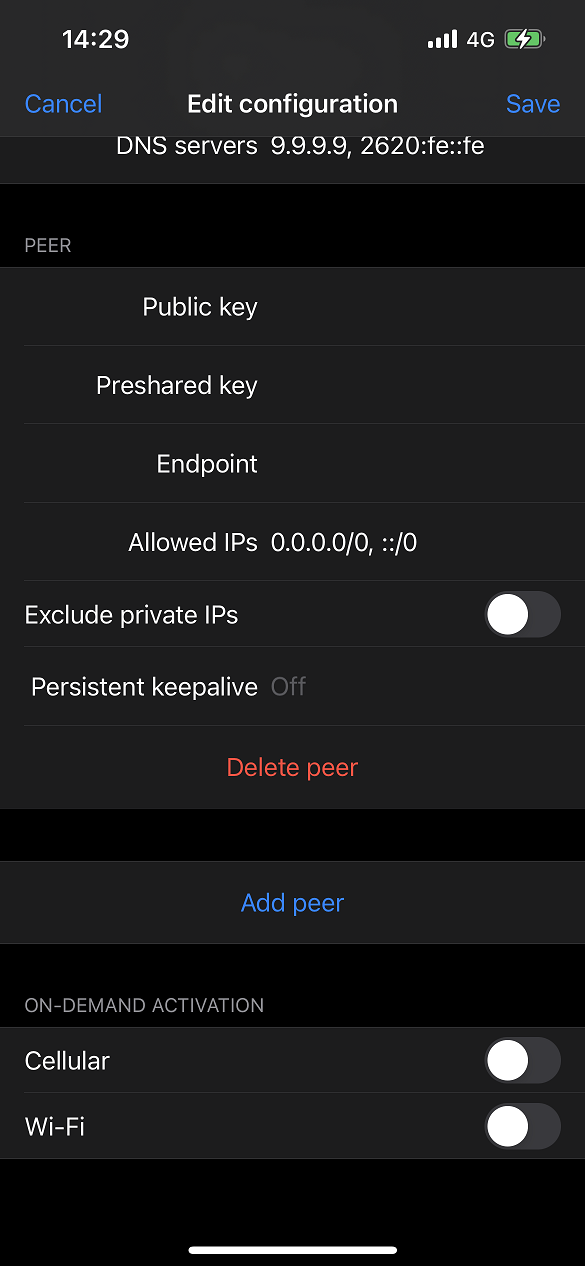
In the peer section:
- Set the Public key field with the server's public key.
-
Set the Preshared key field with the pre-shared key generated on the
server, i.e. content of
/etc/wireguard/client-ios.pskon the server. -
Set the Endpoint field with the IP address (or the domain name) and the
listening port of the server. For example,
example.com:50000. -
Set the Allowed IPs field with
0.0.0.0/0, ::/0so that all traffic from the client can pass through the WireGuard tunnel.
Configure WireGuard on client (OpenBSD)
Generate the client private key, as root:
openssl rand -base64 32 > /etc/wireguard/client.key
chmod 600 /etc/wireguard/client.key
Configure the wg0 interface on the client by adding a file
/etc/hostname.wg0:
inet 10.0.7.3 255.255.255.0
inet6 fd00::7:2719:0:0:1 64

wgkey CLIENT_PRIVATE_KEY

wgpeer SERVER_PUBLIC_KEY wgendpoint SERVER_PUBLIC_IP_OR_DOMAIN 50000 wgpsk PRE_SHARED_KEY wgaip 0.0.0.0/0 wgaip ::/0

up
Note:
-
Replace
CLIENT_PRIVATE_KEYwith the content of/etc/wireguard/client.key. -
Replace
SERVER_PUBLIC_KEYwith the server's public key. -
Replace
SERVER_PUBLIC_IP_OR_DOMAINwith the server's public IP address or domain name. -
Replace
PRE_SHARED_KEYwith the pre-shared key generated on the server, i.e. content of/etc/wireguard/client-openbsd.pskon the server.
Start the interface:
sh /etc/netstart wg0
Check the public key of the client:
ifconfig wg0 | grep wgpubkey
The string after wgpubkey shown on screen is the client's
public key.
Set client public keys on server
Going back to the server, update /etc/hostname.wg0 and
replace the PEER_PUBLIC_KEY placeholders with the public keys
generated on the clients.
Activate WireGuard tunnel (iOS)
Tap on the toggle switch to activate the tunnel. The data sent and received through the tunnel is shown in the tunnel details screen.
Activate and route traffic through the WireGuard tunnel (OpenBSD)
When the wg0 interface is up, the tunnel is activated. You
can verify by using ping(8), for example:
ping -c 3 10.0.7.1
ping6 -c 3 fd00:0:0:7::1
Packets should be sent and received successfully.
To route all traffic through the WireGuard tunnel, run the following to add several routes to the routing table:
# IPv4.
route add -priority 2 SERVER_PUBLIC_IP DEFAULT_GATEWAY
route add -priority 7 default SERVER_WG_IP
# IPv6.
route add -priority 7 -inet6 default CLIENT_WG_IP
Note:
-
Replace
SERVER_PUBLIC_IPwith the server's public IP address. -
Replace
DEFAULT_GATEWAYwith the client's default gateway. For example,192.168.0.1. -
Replace
SERVER_WG_IPwith the server's IP address in the WireGuard tunnel. In this setup, it is10.0.7.1. -
Replace
CLIENT_WG_IPwith the client's IPv6 address in the WireGuard tunnel. In this setup, it isfd00::7:2719:0:0:1.
Verifications
On the client, visit websites like
https://ifconfig.co/ to verify the IP
address is the server's public IP address, instead of the client's public
IP address. On OpenBSD, you can also use ftp(1) to check the
IP addresses. For example:
# IPv4.
ftp -o - -4 https://ifconfig.co/json
# IPv6.
ftp -o - -6 https://ifconfig.co/json
Websites like https://test-ipv6.com/ can be used to verify that the client has a working IPv6 connection.

Deactivate the tunnel (iOS)
Tap on the toggle switch to deactivate the tunnel.
Deactivate the tunnel and restore traffic routing (OpenBSD)
Delete the routes added to the routing table:
# IPv4.
route delete default -priority 7 SERVER_WG_IP
route delete SERVER_PUBLIC_IP -priority 2 DEFAULT_GATEWAY
# IPv6.
route delete -inet6 default -priority 7 CLIENT_WG_IP
Note:
-
Replace
SERVER_WG_IPwith the server's IP address in the WireGuard tunnel. In this setup, it is10.0.7.1. -
Replace
SERVER_PUBLIC_IPwith the server's public IP address. -
Replace
DEFAULT_GATEWAYwith the client's default gateway. For example,192.168.0.1. -
Replace
CLIENT_WG_IPwith the client's IPv6 address in the WireGuard tunnel. In this setup, it isfd00::7:2719:0:0:1.
Mark the wg0 as down on the client:
ifconfig wg0 down