WireGuard on OpenBSD
2020-03-07T13:39:18.000Z.
This article describes the installation and configuration of WireGuard on OpenBSD 6.6 (server) and iOS (client). Once the setup is complete, the traffic from the client will go through the server before reaching the Internet (also known as "road warrior" setup).
The setup assumes the following:
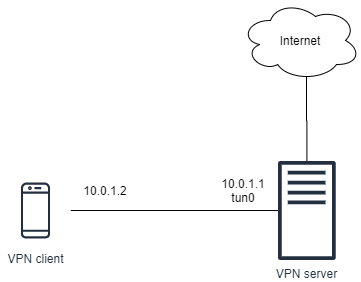
- The VPN has the network address
10.0.1.0/24. -
The server will be assigned with an IP address
10.0.1.1/24within the VPN. - The server will listen on port 50000 for WireGuard traffic.
-
The client will be assigned with an IP address
10.0.1.2/24within the VPN. -
A network interface
tun0on the VPN server will be used by WireGuard.
Install WireGuard
Install the WireGuard packages:
pkg_add wireguard-go wireguard-tools
Enable IP forwarding
Enable IP forwarding by running:
sysctl net.inet.ip.forwarding=1
To make the settings permanent, save the configuration in
/etc/sysctl.conf:
net.inet.ip.forwarding=1
Configure network interface
Create the tun0 interface by creating a file
/etc/hostname.tun0 with the following content:
inet 10.0.1.1 255.255.255.0 10.0.1.255
!/sbin/route add -inet 10.0.1.0/24 10.0.1.1
Start the interface:
sh /etc/netstart tun0
Configure Packet Filter
Configure the Packet Filter (PF) for filtering networking traffic and doing NAT.
In /etc/pf.conf, skip packet filtering on the
tun0 interface:
set skip on { lo tun0 }
Then add the following:
pass in on egress inet proto udp from any to any port 50000
pass out on egress inet from (tun0:network) nat-to (egress:0)
Validate the configuration and reload the ruleset:
pfctl -n -f /etc/pf.conf
pfctl -f /etc/pf.conf
Configure WireGuard
WireGuard configuration files should be put under the
/etc/wireguard/ directory.
mkdir -p /etc/wireguard/
Now create the keypair used by WireGuard on the server:
cd /etc/wireguard/
wg genkey > server.key
wg pubkey < server.key > server.pub
chmod 600 server.key
The server.key contains the server private key and
server.pub contains the server public key.
Now create a pre-shared key used by WireGuard on the server and client.
wg genpsk > peer-01.psk
chmod 600 peer-01.psk
If there are multiple clients, create a pre-shared key for each of the client.
Create the configuration file of WireGuard on the server. Create a file at
/etc/wireguard/server.conf with the following content:
[Interface]
PrivateKey = AAAAA
ListenPort = 50000

[Peer]
PublicKey = BBBBB
PresharedKey = CCCCC
AllowedIPs = 10.0.1.2/32
In the Interface section:
-
Set the
PrivateKeyproperty with the content ofserver.key(i.e. server private key). -
Set the
ListenPortwith the port to be listened by WireGuard.
In the Peer section:
- Leave the
PublicKeyunset for the moment. -
Set the
PresharedKeywith the content ofpeer-01.psk(i.e. the pre-shared key between the server and peer). -
The
AllowedIpsis set with10.0.1.2/32so that the client must connect from the specific (VPN) address, and traffic for the client will be directed to the same address.
Instruct WireGuard to set the configuration of tun0
interface:
wg setconf tun0 /etc/wireguard/server.conf
echo '/usr/local/bin/wg setconf tun0 /etc/wireguard/server.conf' >> /etc/rc.local
Start WireGuard:
rcctl enable wireguard_go
rcctl set wireguard_go flags tun0
rcctl start wireguard_go
Configure VPN client
In WireGuard for iOS, create a new WireGuard tunnel.
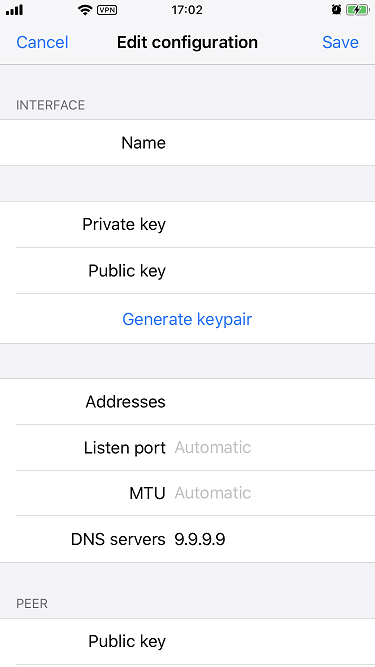
In the interface section:
- Set the Name field with a preferred tunnel name.
- Click Generate keypair to generate the VPN client's private key and public key.
-
Set the Addresses field with the VPN client address, which is
10.0.1.2/32. -
Set the DNS servers field with the preferred DNS server. For example,
set with
9.9.9.9to use Quad9 DNS.
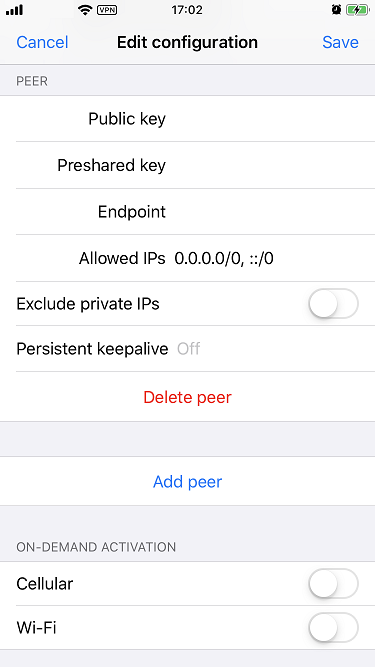
In the peer section:
- Set the Public key field with the server's public key.
-
Set the Preshared key field with the content of
peer-01.pskgenerated above (i.e. the pre-shared key between the server and peer). -
Set the Endpoint field with the IP address (or the domain name) and port
of the server. For example,
example.com:50000. -
Set the Allowed IPs field with
0.0.0.0/0, ::/0so that all traffic from the client will go to the server before reaching the Internet.
Activate VPN tunnel
Update the PublicKey under the Peer section of
/etc/wireguard/server.conf on the server, set the value with
the public key of the VPN client.
The client should be able to connect to the server, and all traffic will go through the server. On the client, you can visit website such as https://ifconfig.co/ to verify the IP address is the server's public IP address, instead of the client's public IP address.
You can run wg on the server to see the WireGuard statistics.